|

Run Direction B (Across the Room)
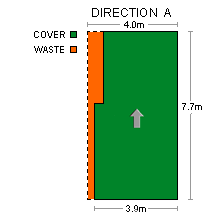
In this example we are using two runs of floorcovering, each run being 3.9 metres long and 4.0 metres wide. This time we are running the floorcovering across the room, and we will have to join the two
runs in the centre of the room (represented by the dotted line in the green area). Notice that there is no wastage in the run at the bottom of the diagram, because it covers an area exactly the same size as the run itself. However, there is wastage and is indicated by the orange coloured area in the top run, because the wall comes in a bit on the left hand side, and the run is 4 metres wide, while the area of the room left to be covered is 7.7 -4.0 = 3.7 metres wide (measured vertically). For this option, the amount of floorcovering needed is 2 runs which are each, 3.9 x 4mt, making a total of 15.6 square metres for each run, making a Grand total of materials needed = 31.2 square metres.
So, which is the better option ?
Well in this case Direction A uses less floorcovering and has no joins, so it may be the best option. However, installations are often not this simple. As you may like to take into consideration the look of the ribs (if any) as just this alone can affect the look of your finished project, don't get to bothered at this stage as we will explain and step you through this when you finally chose your floorcovering.
(Please note: our cost calculators automatically add 100mm (10 centimetres) to the length of each run, and round the total area up to one decimal place. Entering these two runs, each 3.9 metres by 4 metres, into the cost calculator would give the total material needed as 32.0 square metres.) |